How to Upgrade and Setup a 2012 Mac Mini - RAM and SSD Upgrade

Let's not waste any time. If you want a video explaining step-by-step how to upgrade your mac mini, you can watch the video here:
We're upgrading a used Mac mini from 2012. We are upgrading the RAM and the SSD. And I'm going to show you step-by-step how to do just that. So let's get started.
This is everything that you need.
- Mac Mini (can probably find this cheaper on ebay): https://amzn.to/3iTExWu
- SSD: https://amzn.to/34fBBPI
- RAM: https://amzn.to/328Udy6
- Install Kit (Lower Drive Bay): https://amzn.to/2YfBHTD
You obviously need a Mac mini. You need the new hard drive, the couple of sticks of RAM, and then also a little toolkit with a few tools to be able to unscrew some things and open some things up.
Best Budget Friendly Video Editing Setup for MAC in 2021 - Mac Mini Editing Computer for $400???

All right. Today, I want to talk about budget editing computers, and more specifically, I want to take a look at what I think might be the best budget-friendly editing computer available.
And that's a used 2012 Mac Mini.
So what's the reasoning for getting a used 2012 Mac Mini? Well, there are a couple of reasons.
First off, it is the oldest Mac Mini that you can buy that you can still upgrade all the way up to Catalina. And with this being a Mac Mini, I can still go in and swap out some internal components, which I need to do in order to make this a usable machine for me, and it's what needs to be done in order to make this a usable editing machine.
So the first thing I did was take the old HDD storage in the Mac Mini and switch it out for an SSD. This increases the read and write speed on the drive in the Mac Mini so that when you're editing, the files can be accessed quickly.
I also upgraded the Ram in the Mac Mini and I took it from four gigs to 16 gigs. This increases th...
Want Free Training and Resources for your church?
Free Perfect Exposure Mini Course
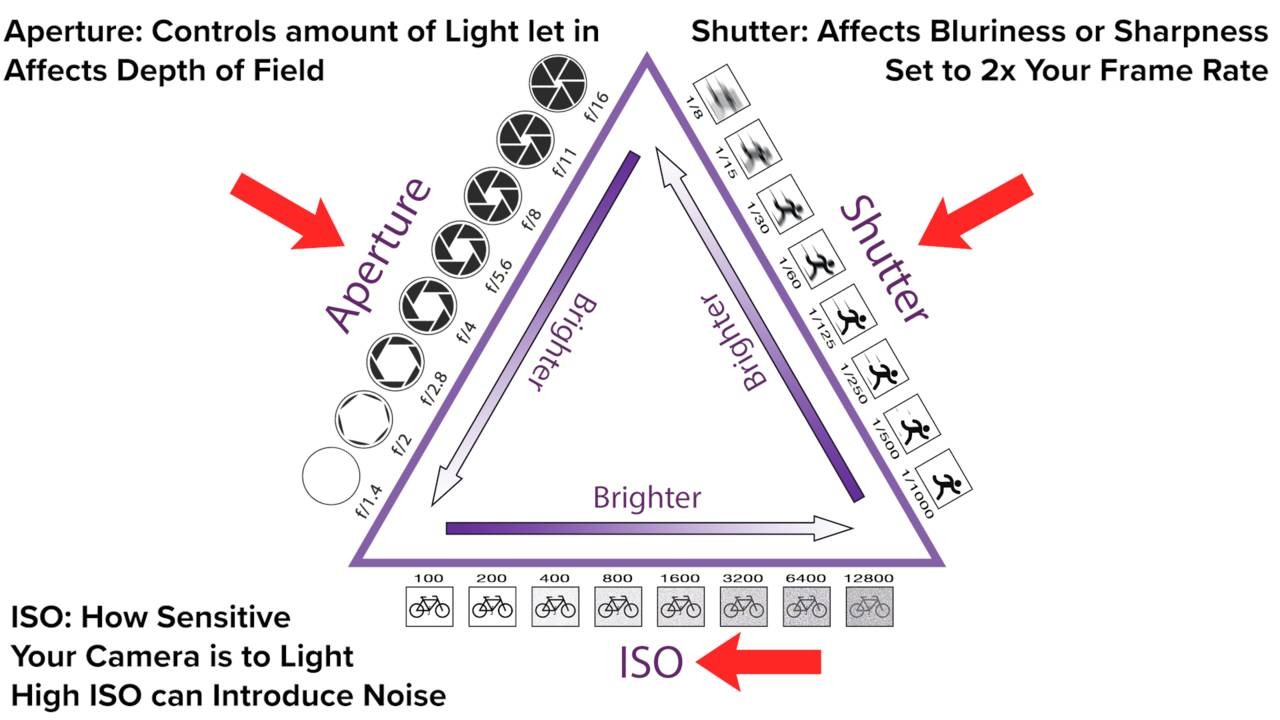
If the videos you shoot are too bright or too dark and you're not sure why.. learn the secrets to nailing exposure every time you shoot.
Church Video Made Simple
Struggling to understand your camera or not sure why the videos you shoot don't look good?
We take the difficulty out of learning camera settings, so you can start shooting high-quality video in no time.
