Web Presenter HD - Setup Guide
In this video, I walk you step by step through the process of setting up the Blackmagic Web Presenter HD and getting you ready to stream as soon as possible.
Setting Up the Blackmagic Web Presenter HD
Powering On and Connecting Video Input
First, power on the Web Presenter HD and connect a video input to the SDI In on the back of the device. Then, add the Web Presenter HD to your network—the same network running your switcher and ATEM software control.
Network Configuration
For those unfamiliar, you can plug the Web Presenter HD and any Blackmagic switchers into a network switch. Any computer connected to that switch can access and control both the switcher and the Web Presenter HD. This setup offers extra control and flexibility from a computer screen rather than navigating menu settings on the devices themselves.
Monitor Out Connection
Make sure your HDMI is connected to the Monitor Out on the back of the Web Presenter so you can see all the data it displays and monitor your live stream easily.
Downloading Software
Once your computer is connected to the same network, download the Web Presenter software from Blackmagic’s website (blackmagicdesign.com/support). Scroll to the latest downloads section and find the most recent Web Presenter software—currently, version 3.0.
Installing and Configuring the Software
After downloading, open and install the Web Presenter application. The software might prompt you to update the firmware on the Web Presenter—ensure it’s up to date. You can then connect to your Web Presenter via the application, either automatically or by manually entering its IP address found in the device's menu settings.
Streaming Settings
In the software, you can edit various settings:
- We're streaming in 1080p at 24 fps.
- Streaming to Restream, which distributes to Facebook and YouTube.
- Streaming quality set to High, adjustable based on your internet capacity.
Additional Controls
You can also go on and off air and choose to live stream directly from your computer. The setup tab allows you to change the Web Presenter's name, language, software version, and audio metering options.
Network Settings
Generally, leaving the network settings at DHCP should work without issue.
Conclusion
That’s a quick overview of setting up the Web Presenter HD and getting it ready to stream. If you have any questions, leave them in the comments below. For more in-depth training for church leaders on digital media and video production, check out the first link in the description. Thank you for watching, and I’ll see you in the next video.
Want Free Training and Resources for your church?
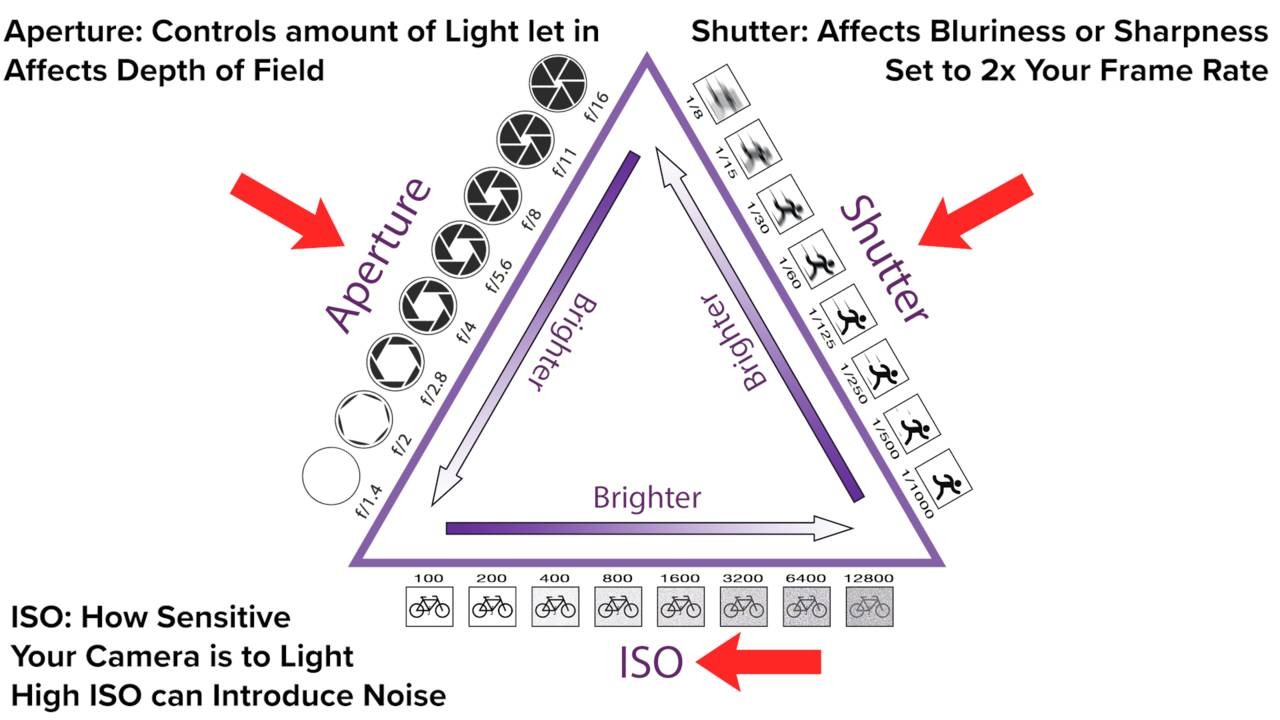
Free Perfect Exposure Mini Course
If the videos you shoot are too bright or too dark and you're not sure why.. learn the secrets to nailing exposure every time you shoot.
Church Video Made Simple
Struggling to understand your camera or not sure why the videos you shoot don't look good?
We take the difficulty out of learning camera settings, so you can start shooting high-quality video in no time.
