The Easiest Way to Run Ambient Pads at Church - The Aerospace Audio Atmosphere Review/Demo
Today, I want to share with you the easiest way to run ambient pads at church using the Atmosphere by Aerospace Audio. Ambient pads are a fantastic tool for creating a rich, immersive worship experience, and the Atmosphere pedal makes it incredibly simple. Let's dive into what this pedal does, how it works, and why it's a game-changer for worship leaders.
What is the Atmosphere Pedal?
The Atmosphere by Aerospace Audio is a compact, user-friendly pedal designed to simplify the ambient pad workflow. Instead of using a more complex setup involving a MIDI keyboard, software, and multiple pieces of hardware, the Atmosphere pedal consolidates everything into one easy-to-use device. You simply plug it in with an instrument cable, connect it to a direct box, and you're ready to go.
Setup and Features
Easy Setup
Setting up the Atmosphere pedal is straightforward. After powering it on, you connect your instrument and direct box. The pedal offers various ambient pad sounds, which you c...
Web Presenter HD - Setup Guide
In this video, I walk you step by step through the process of setting up the Blackmagic Web Presenter HD and getting you ready to stream as soon as possible.
Setting Up the Blackmagic Web Presenter HD
Powering On and Connecting Video Input
First, power on the Web Presenter HD and connect a video input to the SDI In on the back of the device. Then, add the Web Presenter HD to your network—the same network running your switcher and ATEM software control.
Network Configuration
For those unfamiliar, you can plug the Web Presenter HD and any Blackmagic switchers into a network switch. Any computer connected to that switch can access and control both the switcher and the Web Presenter HD. This setup offers extra control and flexibility from a computer screen rather than navigating menu settings on the devices themselves.
Monitor Out Connection
Make sure your HDMI is connected to the Monitor Out on the back of the Web Presenter so you can see all the data it displays and monitor ...
Should Your Church Shoot Video in 1080 or 4K?
Hey everyone, I'm Zach Brown, and today I want to address a common question: Should your church shoot video in 1080p or 4K? This topic is particularly important for church leaders who are new to video production. This article is based on a segment from my in-depth training course, "Church Video Made Simple," which aims to turn complete beginners into confident video creators.
Why Consider 1080p Over 4K?
Visual Difference
One of the primary considerations is the visual difference between 1080p and 4K. For most viewers, especially those watching on standard screens, the difference between 1080p and 4K is negligible. Most screens do not output in 4K, meaning the extra pixels in a 4K image aren't even displayed.
File Sizes
Another critical factor is file size. A 4K image has almost four times the pixels of a 1080p image, resulting in much larger file sizes. This means you'll need significantly more storage space if you opt for 4K. Trust me, there's nothing worse than running out of...
3 Tips for Using ProPresenter 7 Macros more Effectively + Full Breakdown of how we use Macros
Today, I want to share three essential tips for using ProPresenter 7 macros more effectively. Additionally, I’ll provide a full breakdown of how we utilize macros in our setup to streamline our workflow and improve our presentations.
Step-by-Step Guide
Tip 1: Organize and Categorize Your Macros
The first tip is to organize and categorize your macros around your service structure. This means creating macros specifically geared to certain sections of your service. For example, we have four categories of macros: startup macros, pre-service macros, service macros, and post-service macros.
By categorizing macros this way, you keep everything separate and organized. For instance, our list includes a startup macro, pre-service macros, service macros, and an end-of-service macro. They are color-coordinated and labeled according to their section of the service. This organization helps to quickly identify the macros and their purpose, ensuring smooth transitions during the service.
Ti...
How I Created a Custom Countdown Video with Premiere Pro and After Effects
Today, I want to share with you my process for creating a custom live stream countdown for our church. This countdown video works not only for in-person services but also for live streams. In fact, later in this article, I'll explain how I adapted our live stream countdown to create an in-person version.
Step-by-Step Guide
Step 1: Setting Up the Software
I used Adobe Premiere Pro and Adobe After Effects to create the countdown. I started by using After Effects to create the clock and did the rest of the editing in Premiere Pro. If you don't want to use After Effects, there's a link in the video description where you can download a five-minute countdown clock to overlay onto your video.
Step 2: Creating the Countdown Timer
First, I created a new composition in After Effects. I named the composition and set the resolution to 1920x1080 with a frame rate of 23.976 frames per second. The duration was set to the length of the countdown, which in my case was 10 minutes.
Next, I ad...
Budget-Friendly Guide to Filming Church Events: Tips and Gear for Capturing VBS
Watch the Full Video here:

Introduction
In this article, I want to take you behind the scenes as I film for Vacation Bible School (VBS) at my church. We’ll be shooting all week long, and I’ll create a couple of highlight videos from the footage. I'll share what I'm doing, how I'm doing it, and provide some tips and tricks along the way.
Video Goals
We have two main videos to produce from this week’s VBS. First, a highlight video for the Friday night event that all the parents can watch when they come back for the final day. Second, another edit that includes everything from the entire week, which we’ll use for Sunday morning service and on social media. This means I need to gather plenty of footage and be prepared for different types of edits.
Shooting Challenge
To make this relevant for those who might not have a huge budget for gear, I decided to use a simple, budget-friendly setup. The entire camera setup I'm using costs less than $1,000, including the camera, kit lens, ...
The Ultimate Church Production Checklist - Powered by Notion

Hey, Zach Brown here with Church Media Training,
and today I want to talk about what we use at our church for a checklist and resources for our media team.
If you're like us, you might share a similar experience where our media team at our church has actually grown a lot in the last year, and now each team member has a lot of tasks to perform before and during each service. To ensure that things don't start falling through the cracks each and every week, we've developed a system to help us stay on top of every moving piece during the service.
We also wanted a place for our team members to go for quick and helpful resources related to each job that they're doing, now there's a lot of different ways to approach this, but this is just what we've landed on.
We've decided to use a project management and note-taking app called Notion.
Also, just a little side note, if you haven't heard of Notion, you should seriously check it out, it's awesome.
I've used it pretty much every day si...
How to Upgrade and Setup a 2012 Mac Mini - RAM and SSD Upgrade

Let's not waste any time. If you want a video explaining step-by-step how to upgrade your mac mini, you can watch the video here:
We're upgrading a used Mac mini from 2012. We are upgrading the RAM and the SSD. And I'm going to show you step-by-step how to do just that. So let's get started.
This is everything that you need.
- Mac Mini (can probably find this cheaper on ebay): https://amzn.to/3iTExWu
- SSD: https://amzn.to/34fBBPI
- RAM: https://amzn.to/328Udy6
- Install Kit (Lower Drive Bay): https://amzn.to/2YfBHTD
You obviously need a Mac mini. You need the new hard drive, the couple of sticks of RAM, and then also a little toolkit with a few tools to be able to unscrew some things and open some things up.
Best Budget Friendly Video Editing Setup for MAC in 2021 - Mac Mini Editing Computer for $400???

All right. Today, I want to talk about budget editing computers, and more specifically, I want to take a look at what I think might be the best budget-friendly editing computer available.
And that's a used 2012 Mac Mini.
So what's the reasoning for getting a used 2012 Mac Mini? Well, there are a couple of reasons.
First off, it is the oldest Mac Mini that you can buy that you can still upgrade all the way up to Catalina. And with this being a Mac Mini, I can still go in and swap out some internal components, which I need to do in order to make this a usable machine for me, and it's what needs to be done in order to make this a usable editing machine.
So the first thing I did was take the old HDD storage in the Mac Mini and switch it out for an SSD. This increases the read and write speed on the drive in the Mac Mini so that when you're editing, the files can be accessed quickly.
I also upgraded the Ram in the Mac Mini and I took it from four gigs to 16 gigs. This increases th...
Want Free Training and Resources for your church?
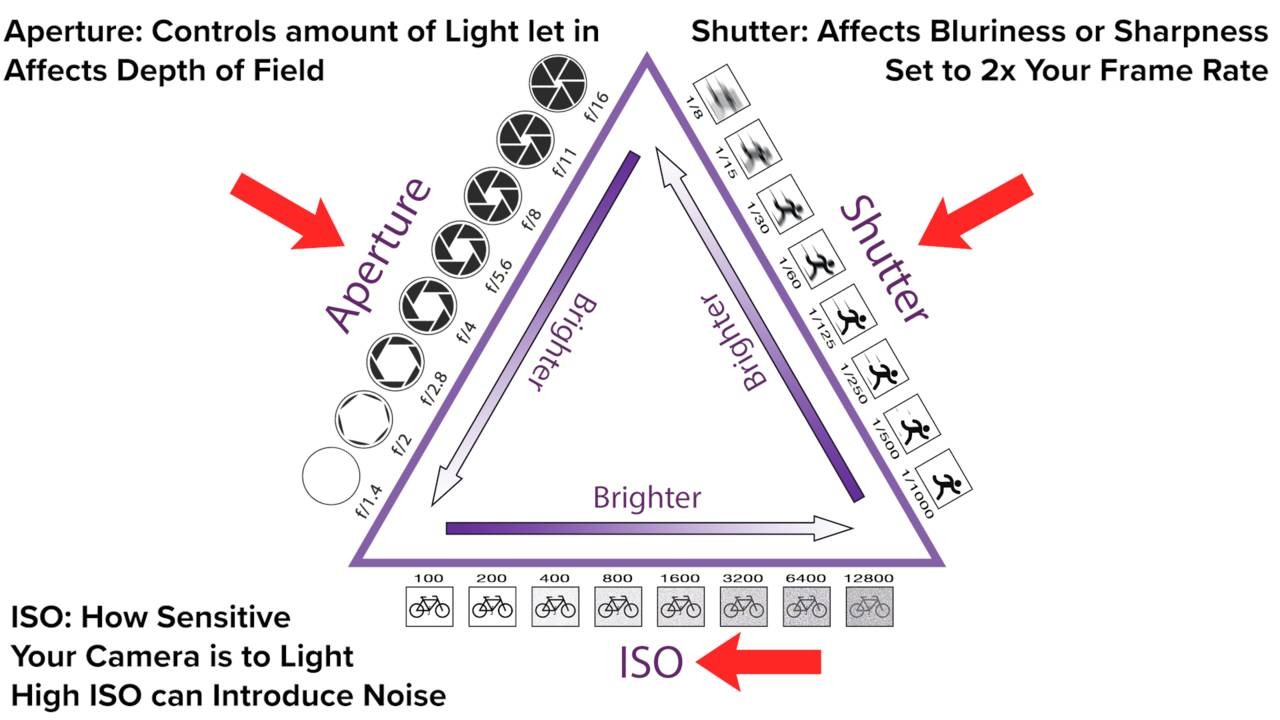
Free Perfect Exposure Mini Course
If the videos you shoot are too bright or too dark and you're not sure why.. learn the secrets to nailing exposure every time you shoot.
Church Video Made Simple
Struggling to understand your camera or not sure why the videos you shoot don't look good?
We take the difficulty out of learning camera settings, so you can start shooting high-quality video in no time.
